Set Up a Streaming Media Server – Pt. 1 – Install OS
Download Software and OS
The first thing you will need to do is download and install VirtualBox.
https://www.virtualbox.org/wiki/Downloads
Next, you need to download an ISO of Ubuntu server.
http://www.ubuntu.com/download/server
You may have heard of Ubuntu and even used it, but Ubuntu server is a little different than what you may have used before because it is strictly command line based, meaning you are only given a console and you have to type in commands. The benefit is that there is lower overhead, better security, and frankly, we don’t even need a user interface because the server will just sit in the background doing its thing. Any kind of interaction we will have with it after everything is set up will be through a web browser.
Once these two things are downloaded, we’ll set up our virtual machine!
Set Up Virtual Machine
Open up VirtualBox and click the New button at the top.
Name: Whatever you want it to be… call it Media Server. It’s mostly just a description.
Type: Linux
Version: Ubuntu (64 bit)
When you’re done click Next. You’ll then be given an option to allocate memory to this virtual machine. The great things about virtual machines is if you find you don’t have enough memory for the virtual machine, you can always adjust it after the fact. Because of this, we will allocate 1024 MB of RAM to this VM.
Ideally your host machine will have 2-4 GB of RAM so you’ll have some left over while this machine is running in the background. Click Next.
Select Create a virtual hard drive now and click Create. Then select VDI and click Next.
Personally, I would select Dynamically allocated storage only because the performance seems fine and you won’t have to take up all the hard drive space at once. Click Next.
Depending on how much content you’re planning on having and the amount of available hard drive space you have, you’ll need to choose how much space you want your VM to have to store stuff. For starting out, I’d recommend 100GB – 300GB, but if you’re willing to give more space, go right ahead. Click Create.
Next we’ll change a few settings to get ready for our first boot. Click Settings at the top. Select System on the left, and click on the Processor tab.

Most likely you have a multi-core processor. Because the server handles video transcoding via the CPU, it would be a good idea to give it more than one core. In this example, I’ve given it two.
Go to Storage on the left and select the Empty CD device. Click on the CD icon under Attributes and select Choose a virtual CD/DVD disk file…
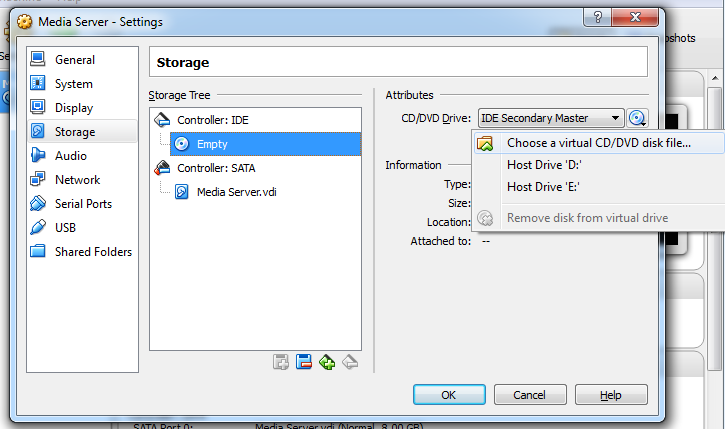
Browse to where you downloaded the Ubuntu Server ISO file and click Open.
Click Network on the left. For Adapter 1, change Attached to to Bridged Adapter. Select OK.
Tada! We’re done! Now we can boot up our VM and install Ubuntu!
Install Ubuntu
Click Start at the top to boot the virtual machine. Once started it will automatically begin the boot menu. VirtualBox will automatically capture input once the window is selected. If you want to get out, you’ll hit the right Ctrl key on your keyboard.
To proceed through you’ll use the arrow keys and the Enter key. Select your language, then hit enter. Select Install Ubuntu Server. For the setup process, you’ll need to select your language, location, keyboard layout (which can auto-detect or you can select No and choose from a list).
You’ll now select a hostname. A hostname is basically a computer name, but it helps identify the machine on the network. For servers, I like to give them cool names based on a naming scheme, but you could just call it media or whatever. Personally, I like to name my servers based on types of coffee. You could come up with your own naming scheme if you like, although since this is probably your only server, there’s no real point to a naming scheme. I mostly just do it for fun. For this example, I’ll call this machine mocha.
You’ll now choose an administrative user account. At this point it’s asking for the full real name of the user. You could put your name in, but this step doesn’t matter that much because you won’t really see what you put in here all that much. Personally, I just make it the same as what my username will be.
Next you’ll choose a username. Because I set the full name in the previous step to server, I’ll also use that for my username. You could choose just about any username you want, unless it breaks one of the specified rules. You also can’t make a user called root or admin since those are reserved.
Next you’ll choose a password. Then you’ll have to confirm it. Pretty self explanatory.
I choose not to encrypt the home directory, just because I’m not really storing any sensitive information on this server. Next it will detect your timezone. After that, you’ll choose a partition scheme, which I always use the default which is as of writing this Guided – use entire disk and set up LVM. You’ll then select the disk to partition (there should only be one to choose). You’ll need to confirm the changes, so select Yes. Then use the maximum available size, which should already been filled in. Then you’ll select Yes to write the changes to disk.
Leave the proxy blank (unless you’re using one).
You have the option of setting up automatic updates. It’s easy to run updates yourself, so I usually select No automatic updates so I have total control of the system.
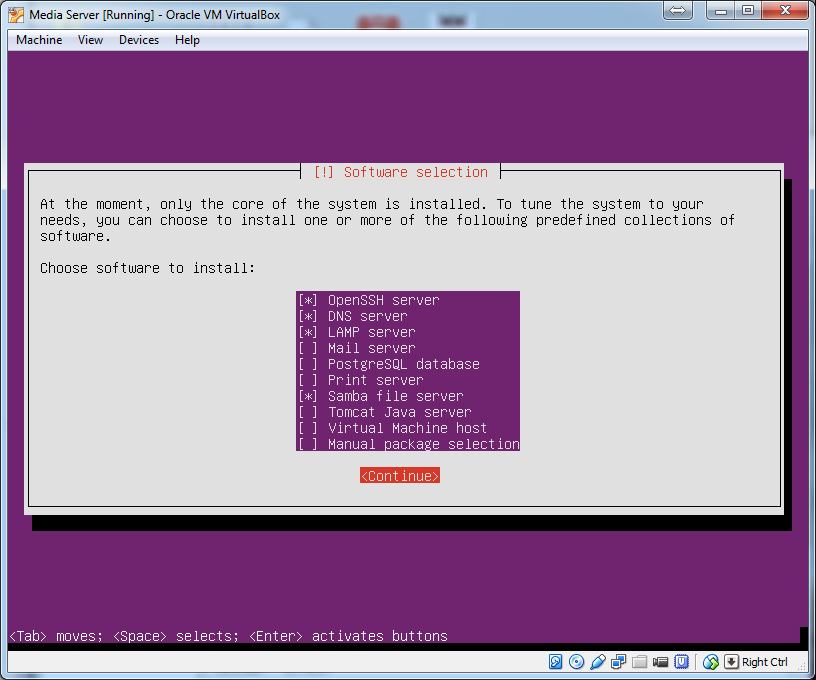
At this point, you’ll select the default software and services to install. You’ll want to make sure OpenSSH server, LAMP server, and Samba file server are selected. Depending on what you want to play around with, you can choose additional options. In this case, I wanted to play around with DNS, but it’s not necessary for what we’re doing here. You can always install this software after everything is set up too, so this step isn’t terribly important.
Because we chose to install the LAMP server, we need to set up the M in LAMP: MySQL. This is just a database system, which I’m not even sure is used in this setup, but we’ll set it up anyway. Choose a password. I usually use the same one as the user I created earlier.
Finally, select Yes to install the GRUB boot loader. The installation is now completed and should have automatically ejected the ISO from the virtual disk drive. Select Continue to reboot the VM.
At this point you’re presented with a login screen. That’s it! That’s the interface. You’re about to get HARDCORE!
This is a great guide to help the less experienced get up and running with these great programs. I have been running sabnzbd on my main desktop for a while but I like the idea of separating everything (media server-wise) into a vm. Instead of creating a 300gb hardrive for the vm could I just symlink to a hosts shared folder and use them …?
I would imagine this would be possible. You would just want to make sure your permissions are set correctly so you’re not running into any issues that way.