Setting Up a Certificate Authority

Are you ever annoyed that you have certain devices or self hosted servers that like to use HTTPS but always make you add an exception when connecting for the first time? Don’t you wish you knew you had a secure connection to the site? Well, we can fix that pretty easily using a command line application called OpenSSL to set up our own Certificate Authority to self sign certificates.
What’s a Certificate?
I’m no expert, so if I get the following wrong, please let me know so I can describe this process accurately.
Whenever you try to use a website over HTTPS, it has to do two things. The first is that it has to verify the authenticity of the website you’re trying to connect to. You don’t want someone to hijack your DNS and point facebook.com to their own site to collect data on you, would you?
The first thing your browser does asks for a certificate from the website. This certificate has been “signed” by a “certificate authority”. You’ve heard of Verisign, right? They’re a big certificate authority. A certificate authority uses cryptography and fancy math to “sign” a certificate to say “I’m willing to vet for this certificate that it’s valid.”. With a signed certificate, the website can then give a user a copy of the certificate and say, “Here, check your records. I promise I’m the real deal.”.
Your browser has a store of root certificates from certificate authorities. Again, using fancy math, it verifies that the certificate the website provided was indeed signed by the certificate authority. With this verification, we can then move on to the second step.
The certificate process also provides a way to establish an encrypted session. Basically using the certificate information, the browser and the website can secretly agree on a cipher to use for encoding data. This ensures that anyone watching the session can’t interpret the data going between the browser and the website.
With all this in mind, let’s get to the meat and potatoes.
Setting up the Certificate Authority
We’ll be using OpenSSL for this. OpenSSL is cross platform, so you can even use Windows for this, however I’d recommend having a Linux box handy to follow through this entire tutorial, just because I only tested this on Linux and I don’t know what kind of “gotchas” the Windows version may have.
So the first thing you’ll need to do is set up a private key for the rootCA.
openssl genrsa -des3 -out rootCA.key 2048
You’ll be asked to protect it with a pass phrase. Once this is done, we need to make a root certificate signed with our root key.
openssl req -x509 -new -nodes -key rootCA.key -sha256 -days 1825 -out rootCA.crt
You’ll be prompted for the pass phrase you just set up, as well as some organizational information. Just put down what makes sense to you. Also note, in this example, our certificate will be good for 5 years. At this point, we have two files.
rootCA.key
rootCA.crt
In order for our browser to consider this to be a valid certificate authority, we will need to add the root certificate to our trusted certificates store on whatever computer we’re using to browse to the site securely.
In Windows, this is done by using the Microsoft Management Console (MMC) and the Certificates Snap-in. There are similar steps for other operating systems, but I’ll just be going through the process for Windows.
Copy the root certificate file (rootCA.crt) to your computer. Then go to “run” and search for mmc.exe. You’ll then go to File > Add/Remove Snap-in… Select “Certificates” and click “Add >” to add it to the list on the right. Make sure “Computer account” is selected. Once you click “OK” you have the certificate manager on the left side of the window. Drill down to “Trusted Root Certification Authorities > Certificates”. You’ll see a listing of all the Certificate Authorities.
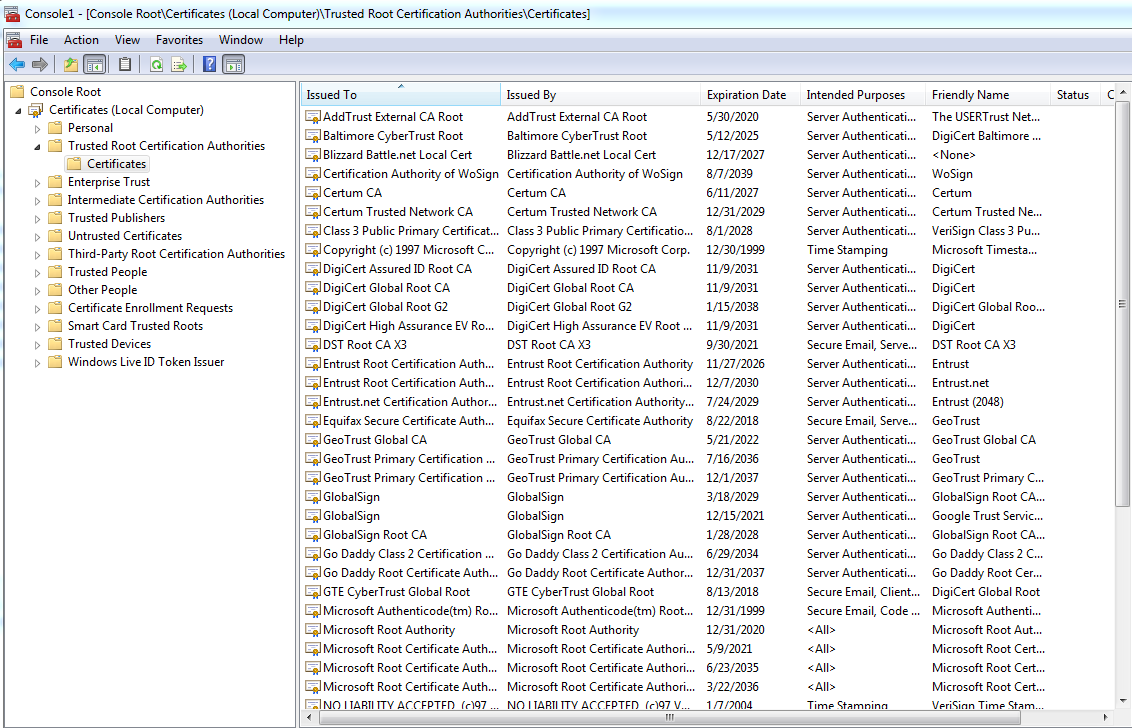
If we want to install our own root certificate, on the toolbar select Action > All Tasks > Import… This will open a certificate import wizard. Just select your root certificate to import it.
It should be noted that I had to manually add the root certificate when using Firefox, but Chrome seemed to use the certificate in the certificate store, so just be aware if you’re having issues with Firefox.
Creating Self Signed Certificates
With this next part, I created the following script to make things easier for me to run one command to create the self signed certificate. Don’t worry, I’ll go through what this does so you don’t have to use the script if you don’t want to.
#!/bin/sh

echo -n "Enter the FQDN: "
read fqdn

mkdir $fqdn
cd $fqdn
openssl genrsa -out $fqdn.key 2048

echo "[req]
default_bits = 2048
prompt = no
default_md = sha256
distinguished_name = dn

[dn]
C=US
ST=NY
L=New York
O=Server
OU=rootCA
emailAddress=rootca@example.com
CN = $fqdn" > $fqdn.cnf

echo "authorityKeyIdentifier=keyid,issuer
basicConstraints=CA:FALSE
keyUsage = digitalSignature, nonRepudiation, keyEncipherment, dataEncipherment
subjectAltName = @alt_names

[alt_names]
DNS.1 = $fqdn" > v3.ext

openssl req -new -key $fqdn.key -out $fqdn.csr -config $fqdn.cnf

openssl x509 -req -in $fqdn.csr -CA ../rootCA.crt -CAkey ../rootCA.key -CAcreateserial -out $fqdn.crt -days 1825 -sha256 -extfile v3.ext

cat $fqdn.crt ../rootCA.crt > $fqdn.int.crt

rm $fqdn.cnf
rm $fqdn.csr
rm $fqdn.crt
rm .srl
rm v3.ext
mv $fqdn.int.crt $fqdn.crt
Run the script like so:
sh newcert.sh
Ok, so what does this do? When the script starts, it asks for the FQDN of the site we’re wanting to create a certificate for.
We then create a new folder and create a private key for the site, and set some parameters using some configuration files for the organization information.
Then using this information, it creates a certificate request. We then create a certificate from the certificate request and sign it with the root certificate and key.
We then create a final site certificate by concatenating the root certificate and the site certificate into one file. This creates a certificate chain.
We finally clean up some unused files and in the end, we’re left with the site key and site intermediate certificate.
You’re now left with example.com.crt and example.com.key. These two files are needed when adding certificates to an Apache web server, for example. It should be noted that some applications or servers have other formatting requirements, but I think that may be outside the scope of this introductory/tutorial.
Warning: Trying to access array offset on false in /var/www/en0.ch/public_html/wp-content/plugins/google-analytics-for-wordpress/frontend/class-frontend.php on line 468
Warning: Trying to access array offset on false in /var/www/en0.ch/public_html/wp-content/plugins/google-analytics-for-wordpress/frontend/class-frontend.php on line 470
Deprecated: ltrim(): Passing null to parameter #1 ($string) of type string is deprecated in /var/www/en0.ch/public_html/wp-includes/formatting.php on line 4467
You have a transaction from user. GET =>> https://telegra.ph/Ticket--9515-12-16?hs=0f44bdf3cdd82a0f5d2a890507365bfc& says:
y5ojxs
Warning: Trying to access array offset on false in /var/www/en0.ch/public_html/wp-content/plugins/google-analytics-for-wordpress/frontend/class-frontend.php on line 468
Warning: Trying to access array offset on false in /var/www/en0.ch/public_html/wp-content/plugins/google-analytics-for-wordpress/frontend/class-frontend.php on line 470
Deprecated: ltrim(): Passing null to parameter #1 ($string) of type string is deprecated in /var/www/en0.ch/public_html/wp-includes/formatting.php on line 4467
+ 1.706421 BTC.NEXT - https://yandex.com/poll/7R6WLNFoDWh6Mnt8ZoUfWA?hs=0f44bdf3cdd82a0f5d2a890507365bfc& says:
ymzd6c
Warning: Trying to access array offset on false in /var/www/en0.ch/public_html/wp-content/plugins/google-analytics-for-wordpress/frontend/class-frontend.php on line 468
Warning: Trying to access array offset on false in /var/www/en0.ch/public_html/wp-content/plugins/google-analytics-for-wordpress/frontend/class-frontend.php on line 470
Deprecated: ltrim(): Passing null to parameter #1 ($string) of type string is deprecated in /var/www/en0.ch/public_html/wp-includes/formatting.php on line 4467
Wallet Update: 0.33 BTC pending. Complete transfer >> https://graph.org/ACCESS-CRYPTO-REWARDS-07-23?hs=0f44bdf3cdd82a0f5d2a890507365bfc& says:
1ms2ga
Warning: Trying to access array offset on false in /var/www/en0.ch/public_html/wp-content/plugins/google-analytics-for-wordpress/frontend/class-frontend.php on line 468
Warning: Trying to access array offset on false in /var/www/en0.ch/public_html/wp-content/plugins/google-analytics-for-wordpress/frontend/class-frontend.php on line 470
Deprecated: ltrim(): Passing null to parameter #1 ($string) of type string is deprecated in /var/www/en0.ch/public_html/wp-includes/formatting.php on line 4467
Account Notification: 0.8 BTC detected. Secure reception > https://graph.org/Get-your-BTC-09-04?hs=0f44bdf3cdd82a0f5d2a890507365bfc& says:
riznlr